Ubuntu 22.04.4 源码安装Point Cloud Library (PCL 1.14.1)和 2.11.1
背景介绍
版本介绍:Ubuntu 22.04.4 ;PCL 1.14.1;Cmake 3.22.1;CloudCompare 2.11.1
在Ubuntu 22.04.4 LTS中安装pcl=1.14。通过apt-get install libpcl-dev的方式会安装pcl=1.12版本,在使用vtk时会发生错误。
安装依赖
1
2
3
4
5
6
7
8
9
10
11
12
13
14
15
16
17
18
19
20
21
| sudo apt-get update
# 以下为必须依赖
sudo apt-get install -y libusb-1.0-0-dev libusb-dev libudev-dev
# libsub是一个开源的用C实现的,可以让应用程序与用户的USB设备进行通信的库,可移植,使用统一的API
sudo apt-get install freeglut3-dev pkg-config
# 安装freeglut,是GLUT(openGL Utility Toolkit)的一个免费开源替代库,在程序中负责创建窗口,初始化opengl上下文和处理输入事件所需的所有系统特定的杂务,从而允许创建真正可移植的OpenGL程序
# ubuntu22.04对应的版本是flnn1.9
sudo apt-get install -y libboost-all-dev libeigen3-dev libflann1.9 libflann-dev
sudo apt-get install -y libvtk9.1 libvtk9.1-qt libvtk9-dev libvtk9-qt-dev
# 安装vtk,2024年2月6日,VTK可以独立使用源码安装,本例直接在依赖项中安装
sudo apt-get install -y libqhull* libopenni2-dev libopenni-dev
|
下载源码
1
2
3
4
5
| sudo apt-get install git
# 安装git
git clone https://github.com/PointCloudLibrary/pcl.git
|
编译PCL源码
1
2
3
4
5
6
7
8
9
10
11
12
13
| # 首先安装make和cmake等
sudo apt-get install -y git build-essential linux-libc-dev cmake
cd pcl && mkdir build && cd build
cmake -DCMAKE_BUILD_TYPE=Release -DCMAKE_INSTALL_PREFIX=/usr ..
# -DCMAKE_GPU=ON -DBUILD_apps=ON -DBUILD_examples=ON
make -j6
sudo make -j4 install
|
PCL测试
示例一
文件组成为

首先,桌面新建文件夹TEST01,右键打开终端,输入sudo vim CMakeLists.txt,具体代码如下:
1
2
3
4
5
6
7
8
9
10
11
12
13
14
| cmake_minimum_required(VERSION 2.6)
project(pcl_test)
find_package(PCL 1.12 REQUIRED)
include_directories(${PCL_INCLUDE_DIRS})
link_directories(${PCL_LIBRARY_DIRS})
add_definitions(${PCL_DEFINITIONS})
add_executable(pcl_test pcl_test.cpp)
target_link_libraries (pcl_test ${PCL_LIBRARIES})
install(TARGETS pcl_test RUNTIME DESTINATION bin)
|
同样地,如上,输入sudo vim pcl_test.cpp,具体代码如下:
1
2
3
4
5
6
7
8
9
10
11
12
13
14
15
16
17
18
19
20
21
22
23
24
25
26
27
28
29
30
| #include <iostream>
#include <pcl/io/pcd_io.h>
#include <pcl/point_types.h>
int
main (int argc, char** argv)
{
pcl::PointCloud<pcl::PointXYZ> cloud;
// Fill in the cloud data
cloud.width = 5;
cloud.height = 1;
cloud.is_dense = false;
cloud.points.resize (cloud.width * cloud.height);
for (size_t i = 0; i < cloud.points.size (); ++i)
{
cloud.points[i].x = 1024 * rand () / (RAND_MAX + 1.0f);
cloud.points[i].y = 1024 * rand () / (RAND_MAX + 1.0f);
cloud.points[i].z = 1024 * rand () / (RAND_MAX + 1.0f);
}
pcl::io::savePCDFileASCII ("test_pcd.pcd", cloud);
std::cerr << "Saved " << cloud.points.size () << " data points to test_pcd.pcd." << std::endl;
for (size_t i = 0; i < cloud.points.size (); ++i)
std::cerr << " " << cloud.points[i].x << " " << cloud.points[i].y << " " << cloud.points[i].z << std::endl;
return (0);
}
|
文件夹右键终端,依次输入如下命令行:
1
2
3
4
5
| mkdir build
cd build
cmake ..
make
./pcl_test
|
最后得到运行结果如下图所示,即为验证PCL库安装成功。

示例二
文件组成为

首先,桌面新建文件夹TEST02,右键打开终端,输入sudo vim CMakeLists.txt,具体代码如下:
1
2
3
4
5
6
7
8
9
10
11
12
13
14
| cmake_minimum_required(VERSION 2.6)
project(pcl_test)
find_package(PCL 1.12 REQUIRED)
include_directories(${PCL_INCLUDE_DIRS})
link_directories(${PCL_LIBRARY_DIRS})
add_definitions(${PCL_DEFINITIONS})
add_executable(pcl_test pcl_test.cpp)
target_link_libraries (pcl_test ${PCL_LIBRARIES})
install(TARGETS pcl_test RUNTIME DESTINATION bin)
|
同样地,如上,输入sudo vim pcl_test.cpp,具体代码如下:
1
2
3
4
5
6
7
8
9
10
11
12
13
14
15
16
17
18
19
20
21
22
23
24
25
26
27
28
29
30
31
32
33
34
35
36
37
38
39
40
41
42
43
44
45
| #include <iostream>
#include <pcl/common/common_headers.h>
#include <pcl/io/pcd_io.h>
#include <pcl/visualization/pcl_visualizer.h>
#include <pcl/visualization/cloud_viewer.h>
#include <pcl/console/parse.h>
int main(int argc, char **argv) {
std::cout << "Test PCL !!!" << std::endl;
pcl::PointCloud<pcl::PointXYZRGB>::Ptr point_cloud_ptr (new pcl::PointCloud<pcl::PointXYZRGB>);
uint8_t r(255), g(15), b(15);
for (float z(-1.0); z <= 1.0; z += 0.05)
{
for (float angle(0.0); angle <= 360.0; angle += 5.0)
{
pcl::PointXYZRGB point;
point.x = 0.5 * cosf (pcl::deg2rad(angle));
point.y = sinf (pcl::deg2rad(angle));
point.z = z;
uint32_t rgb = (static_cast<uint32_t>(r) << 16 |
static_cast<uint32_t>(g) << 8 | static_cast<uint32_t>(b));
point.rgb = *reinterpret_cast<float*>(&rgb);
point_cloud_ptr->points.push_back (point);
}
if (z < 0.0)
{
r -= 12;
g += 12;
}
else
{
g -= 12;
b += 12;
}
}
point_cloud_ptr->width = (int) point_cloud_ptr->points.size ();
point_cloud_ptr->height = 1;
pcl::visualization::CloudViewer viewer ("test");
viewer.showCloud(point_cloud_ptr);
while (!viewer.wasStopped()){ };
return 0;
}
|
文件夹右键终端,依次输入如下命令行:
1
2
3
4
5
| mkdir build
cd build
cmake ..
make
./pcl_test
|
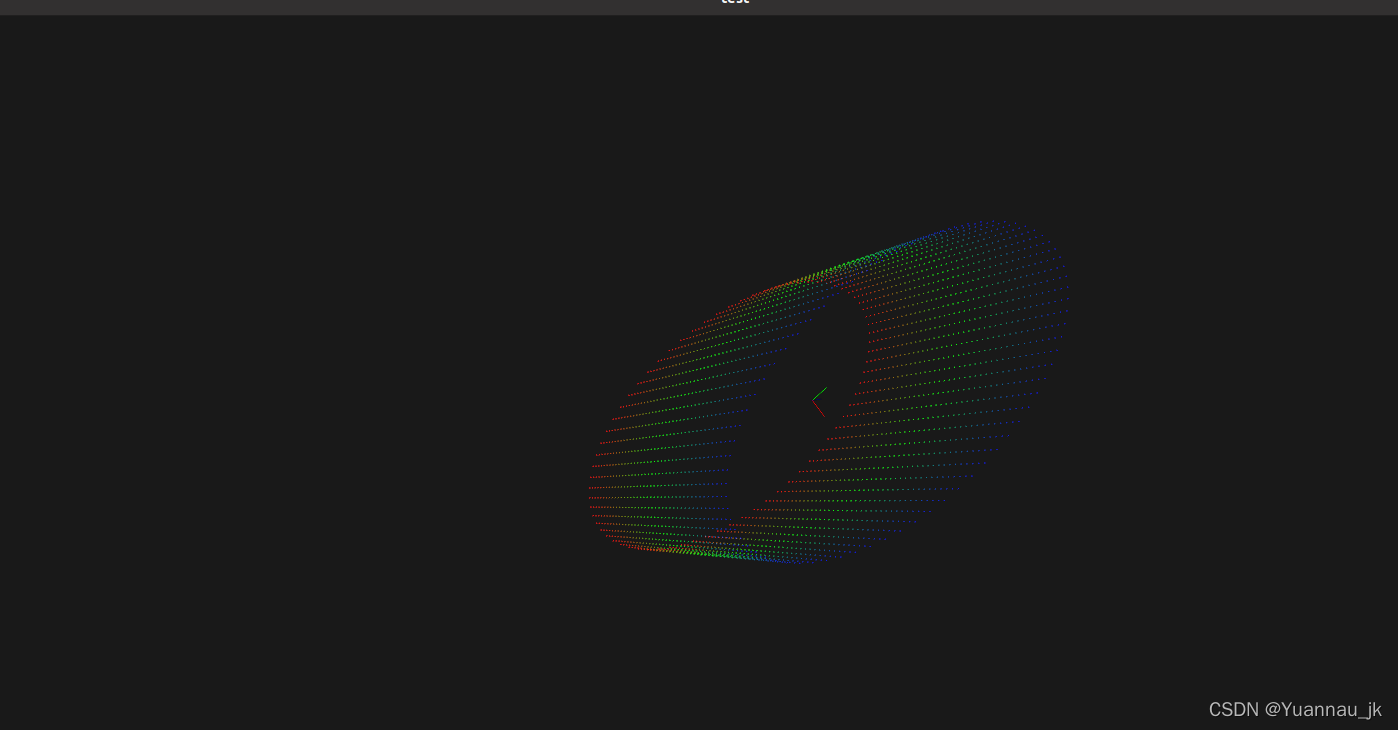
最后得到运行结果如下图所示,即为验证PCL库安装成功。

安装Cloudcompare 2.11.1
推荐snap安装方式
1
2
3
| sudo apt-get update
sudo apt install snap
sudo snap install cloudcompare
|
终端输入命令直接运行
1
2
| cloudcompare.CloudCompare
loudcompare.ccViewer
|


